UV mapping


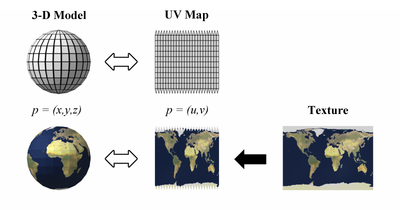
UV mapping is the 3D modeling process of projecting a 3D model's surface to a 2D image for texture mapping. The letters "U" and "V" denote the axes of the 2D texture because "X", "Y", and "Z" are already used to denote the axes of the 3D object in model space, while "W" (in addition to XYZ) is used in calculating quaternion rotations, a common operation in computer graphics.
Process
[edit]UV texturing permits polygons that make up a 3D object to be painted with color (and other surface attributes) from an ordinary image. The image is called a UV texture map.[1] The UV mapping process involves assigning pixels in the image to surface mappings on the polygon, usually done by "programmatically" copying a triangular piece of the image map and pasting it onto a triangle on the object.[2] UV texturing is an alternative to projection mapping (e.g., using any pair of the model's X, Y, Z coordinates or any transformation of the position); it only maps into a texture space rather than into the geometric space of the object. The rendering computation uses the UV texture coordinates to determine how to paint the three-dimensional surface.
Application techniques
[edit]
In the example to the right, a sphere is given a checkered texture in two ways. On the left, without UV mapping, the sphere is carved out of three-dimensional checkers tiling Euclidean space. With UV mapping, the checkers tile the two-dimensional UV space, and points on the sphere map to this space according to their latitude and longitude.

UV unwrapping
[edit]When a model is created as a polygon mesh using a 3D modeller, UV coordinates (also known as texture coordinates) can be generated for each vertex in the mesh. One way is for the 3D modeller to unfold the triangle mesh at the seams, automatically laying out the triangles on a flat page. If the mesh is a UV sphere, for example, the modeller might transform it into an equirectangular projection. Once the model is unwrapped, the artist can paint a texture on each triangle individually, using the unwrapped mesh as a template. When the scene is rendered, each triangle will map to the appropriate texture from the "decal sheet".
A UV map can either be generated automatically by the software application, made manually by the artist, or some combination of both. Often a UV map will be generated, and then the artist will adjust and optimize it to minimize seams and overlaps. If the model is symmetric, the artist might overlap opposite triangles to allow painting both sides simultaneously.
UV coordinates are optionally applied per face.[2] This means a shared spatial vertex position can have different UV coordinates for each of its triangles, so adjacent triangles can be cut apart and positioned on different areas of the texture map.
The UV mapping process at its simplest requires three steps: unwrapping the mesh, creating the texture, and applying the texture to a respective face of polygon.[1]
UV mapping may use repeating textures, or an injective 'unique' mapping as a prerequisite for baking.
Finding UV on a sphere
[edit]For any point on the sphere, calculate , that being the unit vector from to the sphere's origin.
Assuming that the sphere's poles are aligned with the Y axis, UV coordinates in the range can then be calculated as follows:
See also
[edit]- Cartographic projection
- Geodesic
- Least squares conformal map
- Mesh parameterization
- NURBS
- Polygon mesh
- Radon transformation
- Lightmap
- Digital sculpting
- Barycentric coordinate system
References
[edit]- ^ a b Mullen, T (2009). Mastering Blender. 1st ed. Indianapolis, Indiana: Wiley Publishing, Inc. ISBN 9780470496848
- ^ a b Murdock, K.L. (2008). 3ds Max 2009 Bible. 1st ed. Indianapolis, Indiana: Wiley Publishing, Inc. ISBN 9780470417584


![{\displaystyle [0,1]}](https://wikimedia.org/api/rest_v1/media/math/render/svg/738f7d23bb2d9642bab520020873cccbef49768d)

